Showing posts with label Windows | Windows 8. Show all posts

Saturday, December 7, 2013

Personalize Windows 8.1 Desktop and Start Screen


Personalize Windows 8.1 Desktop and Start Screen


Posted on Jul 19 2013 - 8:44pm by Maddy Acca

It is a magnificent experience to use Windows 8.1, but it is dramatically changed as compared to the previous versions of Windows. Advanced, tiled and colorful interface of this update was designed while keeping in mind the touch screen and mobile devices. The actual importance of Windows 8.1 Start screen lies yet in the customization according to your requirements.


You will definitely appreciate if you get a chance to sort out the tiles on the Start Screen of Windows 8.1 because it will help you in accessing all of most used apps and you would be able to view your required things at a glance.
So let’s have a look on how to personalize the Desktop and Start Screen in Windows 8.1.

Move Tiles

If you want to change the place of Tiles for your convenience, you can do it. You can keep your most wanted tiles at the front and the tiles less important for you can be kept in the back. You just need to drag a tile to move it to your desired place.

Create Group Tiles

You can also create group tiles for an easy access. Suppose you want to create a group consists of Health and Tips, Sports, News and Food & Drink tiles, you just need to drag the tile to the right side until you see a gray bar. When you see the gray bar, put the tile there. Now one by one drag remaining three tiles behind that gray bar. It will form a group of these four tiles and you do not need to look for every tile from them here and there.

Create Group Tiles in Windows 8.1 Metro UIAssign the Group Name

You can assign this group a name by right clicking on any of these tiles. In the upper corner a bar will appear where you have to type a name for this group.

Create Group Names for Tiles in Windows 8.1Change the Size of Tiles

Now you can change the size of the tiles to a greater extent. You need to right click your desired tile and some options will appear at the bottom of your screen. Here you will find the “Resize” option. You need to click on it.
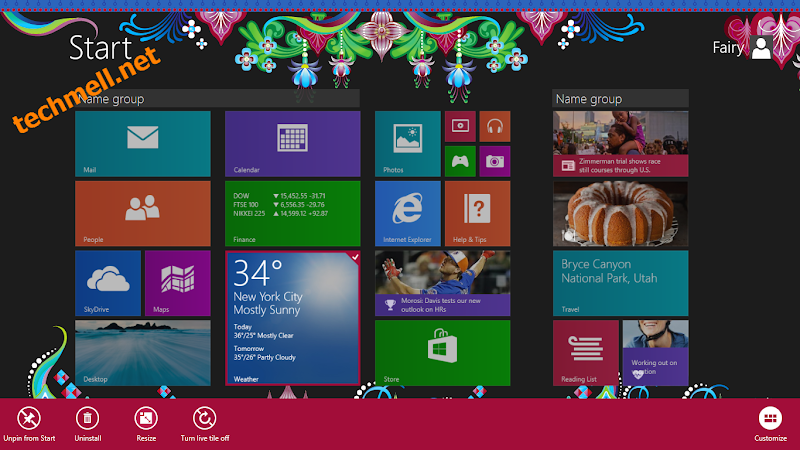
Resize option for Tiles in Windows 8.1Now four different sizes will appear where in you need to select your required size.

Resize tiles in Windows 8.1Remove the Tiles from Start Screen

If you consider a tile less important for you, you can remove it from the Start Screen. It will be available in the apps, but it will be removed from the Start Screen. You can anytime pin it to the Start Screen later.
You need to right click on the app you want to remove from the Start Screen. Some options will appear at the bottom of your screen. Look for the option “Unpin from Start” and click on it. It will remove your desired tile from the Start Screen.

Unpin a Tile from Start in Windows 8.1Change the Colors of the Start Screen

Microsoft provides you a wide range of features and one of them is to change the color of the Start Screen and to change the background. The background can be changed only on Start Screen, but the color will appear in charms, start screen and the sign-in screen too. You can change the colors of the Start Screen by going to the “Settings” category.
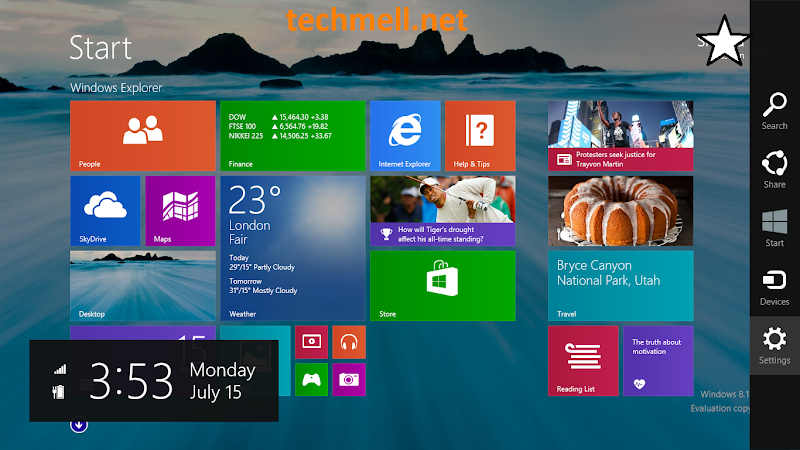
Settings Category in Windows 8.1Now go to “Personalize” option that can be found at the top right side of your screen.
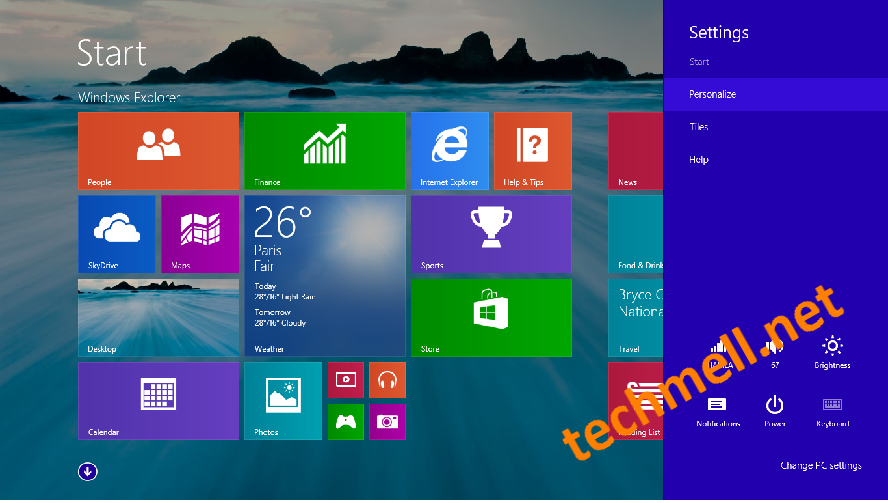
Personalize Windows 8.1Here, you will see a wide range of colors and you can select a color you desire to apply to your Start Screen.
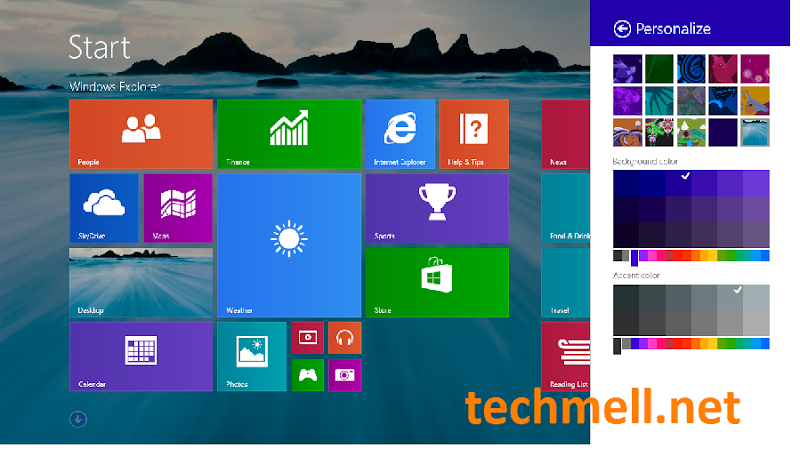
Personalize a Color for Windows 8.1Change the Lock Screen Background

You can also change the Lock Screen Background by going to the option “Change PC Settings” in the category of “Settings”.
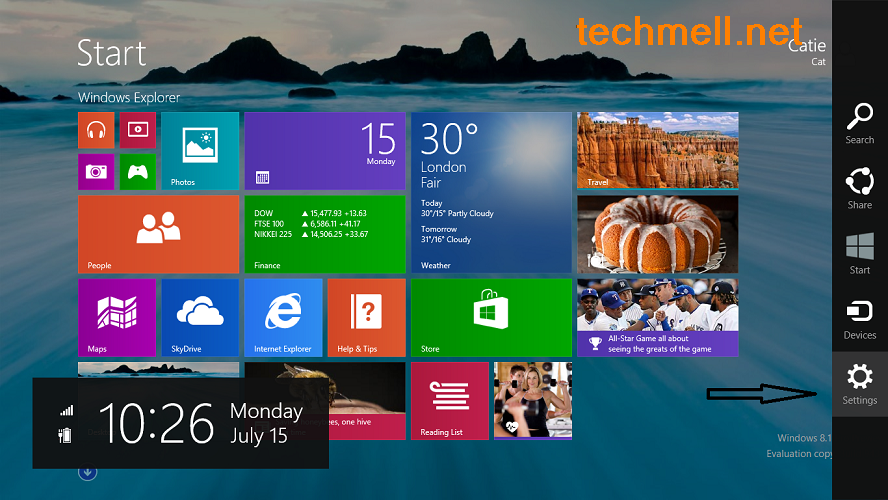
Settings in Windows 8.1Here you need to click “Personalize” and then click on the option Lock Screen.
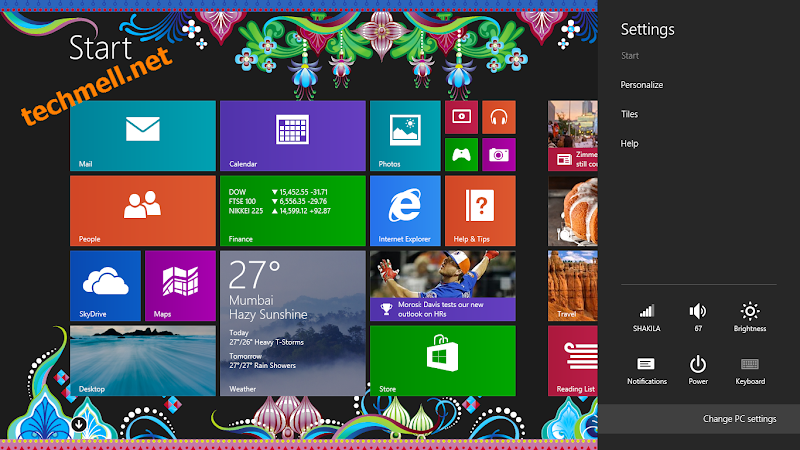
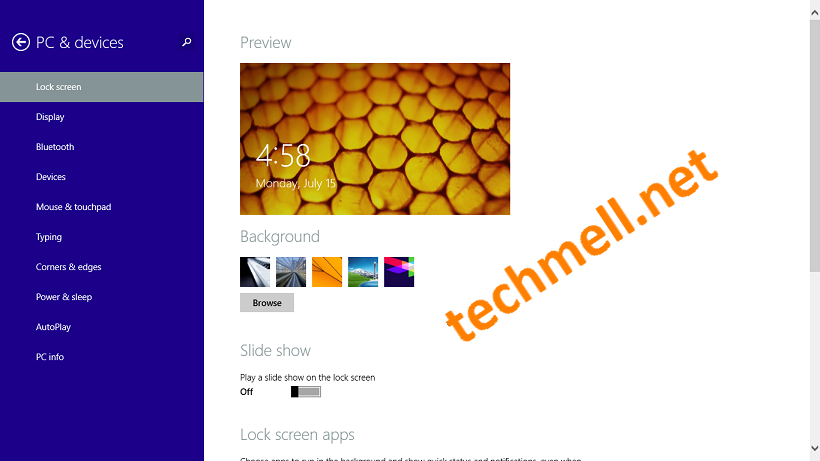
Personalize Start Screen in Windows 8.1
Lock Screen Settings in Windows 8.1Now you can change the current image according to your preference.
Get Missing Quick Launch Icons in Windows 8.1′s Taskbar


Get Missing Quick Launch Icons in Windows 8.1′s Taskbar

Posted on Jul 21 2013 - 7:06pm by Maddy Acca

The users of Windows 8.1 can follow various ways to add Quick Launch icon to their taskbar because newer operating systems do not include Quick Launch feature and the users are in dismay due to the unavailability of this useful feature. Windows 8.1 also does not contain this feature, but it does not seem so confusing because the Taskbar and Metro UI are sufficient for the users in Windows 8.1. But still a large majority of the users considers Quick Launch very useful for them because it makes their tasks easier if they have a Quick Launch icon on the taskbar because it will help them in opening the most wanted apps quicker. You generally use a few apps frequently and it becomes more hectic to open apps and search for your required app every time. If you have put your most wanted apps to the Quick Launch folder and it has been added to your taskbar, it will be a bit easier for you to access them without visiting apps section. So, here you will find the detailed step-by-step tutorial for adding a Quick Launch icon to the taskbar in Windows 8.1.


Directions to Add Quick Launch icons to Windows 8.1 Taskbar

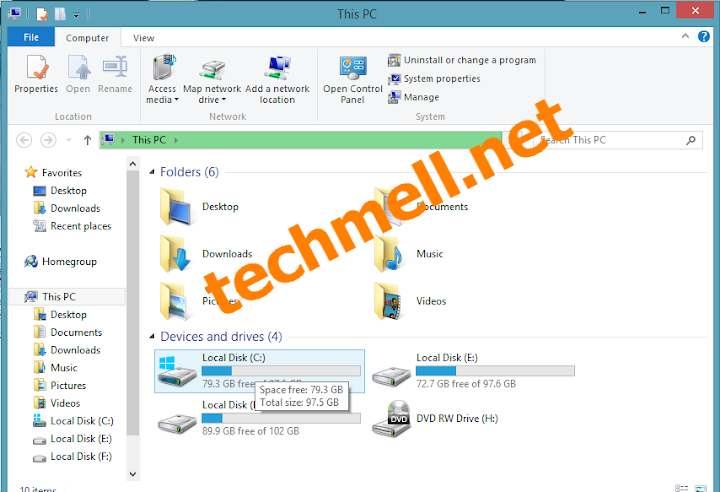
Step 1: First, you need to go to This PC and click on the Drive: C.
This PC in Windows 8.1Step 2: Now right click to create a new folder in C drive. You can also use Ctrl+Shift+N that is a shortcut for creating a new folder.
Create New Folder in Windows 8.1Step 3: Give it a name “QuickLaunch”. You need to copy all of your most wanted apps to this folder. Personally, I copied a typing tutor and my office work folder because I use these two things most of the time.
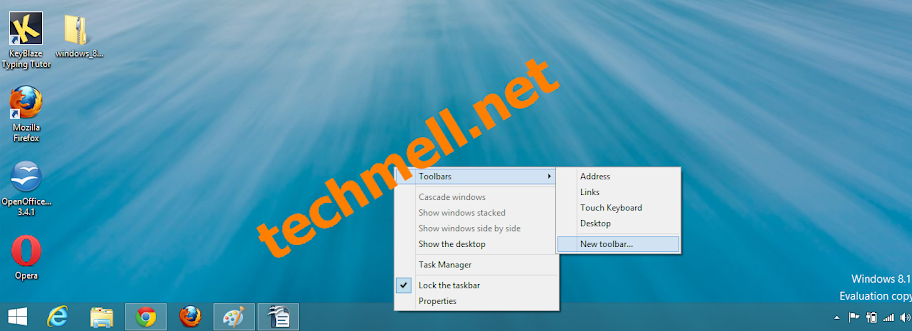
QuickLaunch Folder in C Drive in Windows 8.1Step 4: Now switch to your taskbar and right click on it. You need to select the option “Toolbar” and then “New Toolbar” in the menu appearing before you.
New Toolbar option on Taskbar in Windows 8.1Step 5: Now a window opens on your screen where you need to search for the C drive and once you get it, click on the QuickLaunch and click the option “Select Folder”.
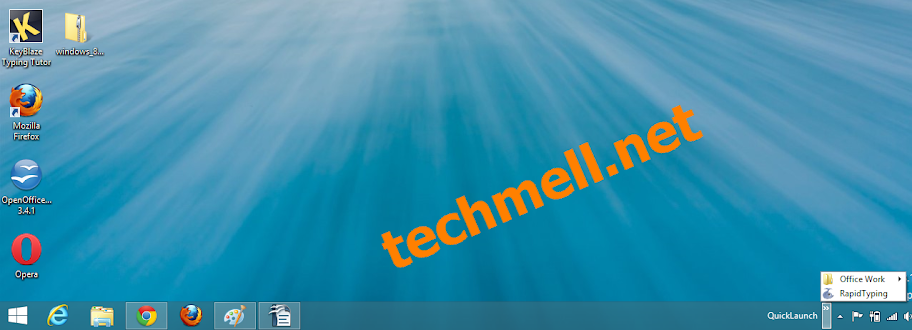
QuickLaunch folder for Taskbar in Windows 8.1Step 6: So, it appears on the taskbar and by clicking it, you can view all of your required apps you wanted to access quickly and it is easier for you to pick any file you require.
QuickLaunch on taskbar in Windows 8.1

Lock your Folders in Windows 8.1 with TrueCrypt


Lock your Folders in Windows 8.1 with TrueCrypt


Posted on Jul 15 2013 - 8:02pm by Maddy Acca


Generally the people want to make their personal folder password protected and they do not find any direct way to use for this purpose in Windows 8.1. They can do so by using a third party software TrueCrypt that allows you to reach your folders if you provide a password for them.
If you are using a shared computer, you need to make all of your necessary documents password protected in order to make them secure. There are various third party software available online and these software are absolutely compatible with Windows 8.1, but you can perform this task even without using a third party software. Below you will find a very easy method to password protect your important folders in Windows 8.1.

Steps to Password Protect Folders in Windows 8.1

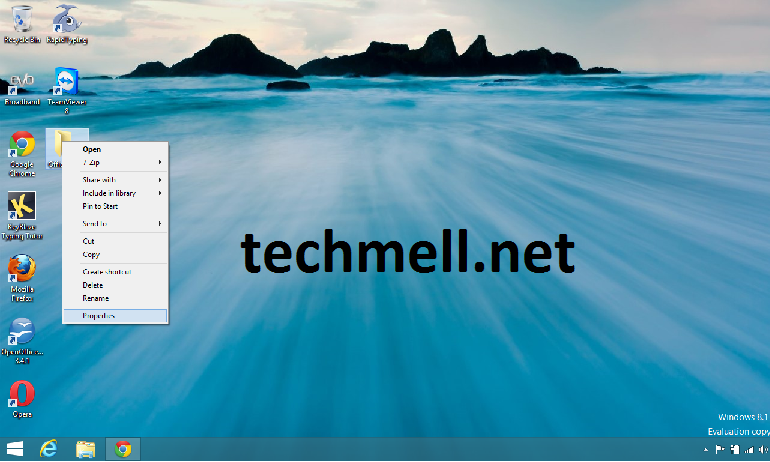
Step 1: Go to the folder that you want to password protected and right click on it. It will show “Properties” option that should be selected to proceed ahead.
Folder PropertiesStep 2: Now you will see a tab “Security”. Go to it. Now you will find a few user names whom you have to select because you want to deny them for accessing your folder.
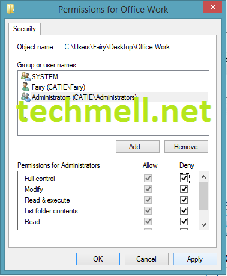
Security Tab in Folder's Properties in Windows 8.1Step 3: Once you have done with it, below you will find the option “Edit” that should be clicked to go ahead. Now you will see another window where the same user groups will exist. You need to select the previously selected user again and below under the “Deny” category, there will be some check boxes. You need to mark them all and press “Apply” and then “OK” to save these changes.
User's Restriction Options for Folders in Windows 8.1Now you can easily make your folders out of the reach of everyone while using a shared computer. You can also use a third party software such as TrueCrypt for this purpose. It can be downloaded from here.

Top 10 Tips for Windows 8.1 Users to Get Started


Top 10 Tips for Windows 8.1 Users to Get Started


Posted on Jun 30 2013 - 2:31pm by Maddy Acca


On 26th of june Windows 8.1 Preview has been launched by Microsoft and the users keen to use it can install it to their systems. It should be avoided to install on productive systems because all of the previously installed applications and programs will be lost once you install Windows 8.1 Preview to it.
This update includes various changes and improved features. One example is that when you install applications in Windows 8.1 Preview, you will not find these apps in your Start page. It seems a little change, but it shows that you need to search out the way how to pin these apps to the Start page.

Best Windows 8.1 Tips for Beginners

1) Directly Boot to Desktop

Boot to DesktopIn Windows 8.1 you will find an option “Boot to Desktop” and if you have activated it, you will be led towards the desktop of OS to start bypassing your “Start” screen.
  1. You should right click on the taskbar and go to the “Properties” from the menu appearing in front of you.
  2. Now you will be in “Taskbar and Navigation Properties”.
  3. Move to the tab “Navigation”.
  4. You need to search the box “Go to the Desktop Instead of Start When I Sign In” and when you find it, you need to mark it.

2) Customizing Tile icons

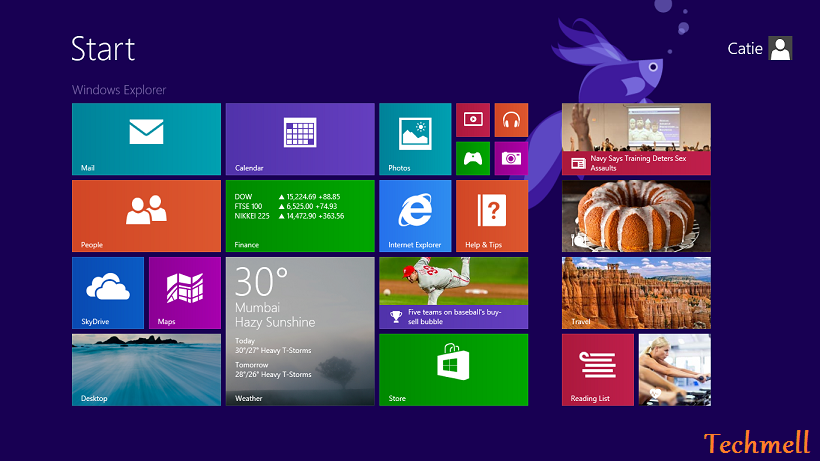
Windows 8.1 TilesThe users will find two advanced tile sizes in this update. You would be able to resize those 50% smaller and the smallest in it. You would be able to enlarge them to the biggest size as well.
Moreover, you would be able to resize one or various tiles in the “Start” screen by right clicking on them. Medium and Wide are two sizes for the tiles that were also found in Windows 8, but the two new tile sizes Small and Large have been added new into Windows 8.1 by Microsoft.
You can drag and drop various tiles to your desired place by selecting them and you can uninstall them very easily if you want to do so.

3) Improved Search

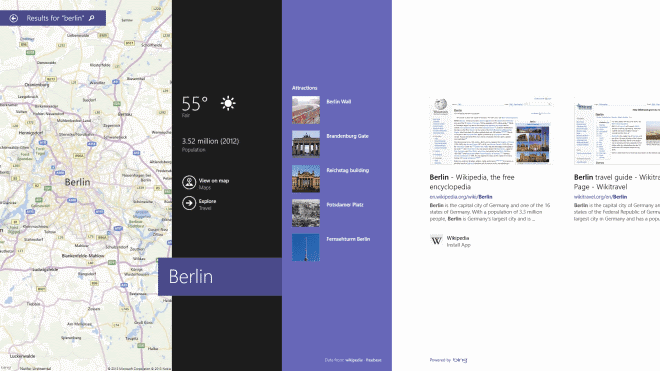
Search Windows 8.1Now you would be able to use the search function directly from the Start screen of this update. In the previous Windows, you used to get the results in three sorted categories, but now you would have a formed search undergo. Moreover the search results have also been integrated by Microsoft.
Anything you are looking for will be displayed next to the web results bar for you. You would be directly led towards the program, tool or app in the system you were looking for.
For example, if you are looking for “Steam” it will display the “Steam” app you had installed earlier in it. If you are looking for Berlin, it will display the map of the city and important information such as videos, current temperature, weather and much more.

4) New Apps in Windows 8.1

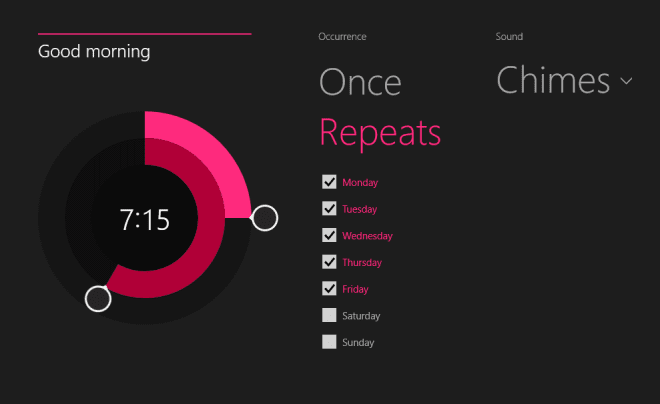
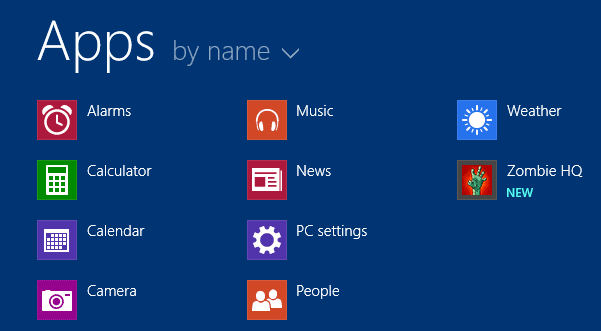
New AppsYou will not see the list of complete apps in “Start” screen. Some apps such as Alarms and Calculator are not prominent here. If you want to add these apps to “Start”, you need to go to the “Apps View” and right click on the apps you want to add to the “Start”.
Calculator: You will see it in both of the scientific and standard mode that helps you in converting units as well.
Sound Recorder: It is the basic Sound Recorder of Windows in application form.
Alarms: This app provides you timer, stopwatch and alarm clock functions. You can set various alarms in it.
Scan: If you want to control the scanners attached with your Desktop for scanning documents, you can use it.

5) Desktop Wallpaper Customization

Windows 8.1 enables you to display the desktop wallpaper to the “Start” screen now. It is amazing feature and to activate it you need to go to the “Taskbar and Navigation” properties and click on the “Navigation”. Here you should mark the “Show my Desktop Background on Start” to activate it.
It will display your desired wallpaper not only to the desktop, but also to the “Start” screen.

6) Media Libraries

You will not find Libraries in Windows Explorer as it has been displayed earlier while the Music, Documents and Pictures categories can be found here. If you want to display Libraries, you need to right click to the sidebar of Windows Explorer and click on the “Show Libraries” option from the context menu.

7) Display Address Bar & Tabs in IE 11 All the Time

When you open IE, it will hide the address bar and the tabs are opened after a while. It is a great option for the users having small screen who intend to use the entire space of their screen to show sites. The users with large resolution or screen would be able to see the address bar and tabs for full time for an easier access.
  1. You need to go to Start screen and open IE 11.
  2. Now click to the “Windows – C to open the “Charms Bar”.
  3. Now click on the “Settings” and go to the “Options”.
  4. Select the option “Always Show Address Bar & Tabs”.

8) The Start Button Menu

When you click the “Start” option, you will not see the start menu. Instead of it you will see the start screen interface. Yet, you can right click on it to see the context menu.
It shows a shutdown option that can be used for changing the power state of your desktop. Some other options are control panel and search or run box, etc.

9) Easy Access to Apps

There are two “All Apps Screen Preferences” in the Taskbar and Navigation” properties that will be so useful for the users.
  1. Show The Apps View Automatically When I Go To Start: This option displays the applications in the list form instead of showing them to the start screen when you need to see them.
  2. List Desktop Apps First in the Apps View When it’s Sorted by Category: This option helps in sending the desktop programs and applications to the front for your easier access.

10) Access Newly Installed Apps

If you install any app to your Windows 8.1 Preview, it will not be displayed automatically to your Start screen. They can be found in the “All Apps Page”. If you want to get there, you need to select the small arrow down key that can be found on the “Start” screen.
Previously you had to use the right click option to get there, but now Microsoft has removed this option and you can swipe up to move there if you are using a Smartphone.
Apps by NameHere, you will see all of the apps you installed on it. New programs and applications are prominent by having a new sign below them and due to this sign, these programs and apps are easy to search.
Get your Windows 8.1 Preview Product Key Now


Get your Windows 8.1 Preview Product Key Now

Posted on Jun 27 2013 - 3:21am by Maddy Acca


The users would be glad to know that the Preview version of Windows 8.1 has been officially launched by Microsoft and this Preview build can be accessed as an update by all of the current users of Windows 8. The users would be glad to know that they can access and download Windows 8.1 Preview in the form of ISO file that has been made possible by Microsoft that took this initiative to encourage more and more Windows 7 and Vista users to try this update out. It will also enable the current users of Windows 8 to try 8.1 Preview versions of Windows without upgrading their devices to the Windows 8.1.
Win 8.1 Start
You can use this update for adding a new “Start Screen”, the Start button for a menu and the option to restart your system directly from your desktop. It also enables you to access the updated Windows Store, IE 11, countless amazing Windows 8 features and Picture lock screen type of amazing apps. To summarize, the users would be able to make more than 800 alterations by using Windows 8.1 Preview.

Windows 8.1 Preview Product Key

The users of Windows 8 who are planning to upgrade to Windows 8.1 will not be asked anyproduct key. Yet, the users who are installing Windows 8 will probably need to provide the product key while the installation process is going on.
Microsoft has issued a product key that can be used for installation and activation of the Windows 8.1 Preview. The key is NTTX3-RV7VB-T7X7F-WQYYY-9Y92F and it can be used by every individual who want to try out Windows 8.1 Preview. According to the announcement of Microsoft representatives, this product key can be used by every individual who intends to try out Windows 8.1 Preview and if he needs to install Windows 8, he should provide the relevant product key.
Important Note: The users need to be well versed with another fact regarding Windows 8.1 Preview that they should avoid upgrading the current Windows 8 to Windows 8.1 Preview because if you do so, you need to reinstall all of the applications and programs again.

Monday, July 22, 2013

Get your Windows 8.1 Preview Product Key Now


Get your Windows 8.1 Preview Product Key Now

Posted on Jun 27 2013 - 3:21am by Maddy Acca


The users would be glad to know that the Preview version of Windows 8.1 has been officially launched by Microsoft and this Preview build can be accessed as an update by all of the current users of Windows 8. The users would be glad to know that they can access and download Windows 8.1 Preview in the form of ISO file that has been made possible by Microsoft that took this initiative to encourage more and more Windows 7 and Vista users to try this update out. It will also enable the current users of Windows 8 to try 8.1 Preview versions of Windows without upgrading their devices to the Windows 8.1.
Win 8.1 Start
You can use this update for adding a new “Start Screen”, the Start button for a menu and the option to restart your system directly from your desktop. It also enables you to access the updated Windows Store, IE 11, countless amazing Windows 8 features and Picture lock screen type of amazing apps. To summarize, the users would be able to make more than 800 alterations by using Windows 8.1 Preview.

Windows 8.1 Preview Product Key

The users of Windows 8 who are planning to upgrade to Windows 8.1 will not be asked anyproduct key. Yet, the users who are installing Windows 8 will probably need to provide the product key while the installation process is going on.
Microsoft has issued a product key that can be used for installation and activation of the Windows 8.1 Preview. The key is NTTX3-RV7VB-T7X7F-WQYYY-9Y92F and it can be used by every individual who want to try out Windows 8.1 Preview. According to the announcement of Microsoft representatives, this product key can be used by every individual who intends to try out Windows 8.1 Preview and if he needs to install Windows 8, he should provide the relevant product key.
Important Note: The users need to be well versed with another fact regarding Windows 8.1 Preview that they should avoid upgrading the current Windows 8 to Windows 8.1 Preview because if you do so, you need to reinstall all of the applications and programs again.

Top 10 Tips for Windows 8.1 Users to Get Started


Top 10 Tips for Windows 8.1 Users to Get Started


Posted on Jun 30 2013 - 2:31pm by Maddy Acca


On 26th of june Windows 8.1 Preview has been launched by Microsoft and the users keen to use it can install it to their systems. It should be avoided to install on productive systems because all of the previously installed applications and programs will be lost once you install Windows 8.1 Preview to it.
This update includes various changes and improved features. One example is that when you install applications in Windows 8.1 Preview, you will not find these apps in your Start page. It seems a little change, but it shows that you need to search out the way how to pin these apps to the Start page.

Best Windows 8.1 Tips for Beginners

1) Directly Boot to Desktop

Boot to DesktopIn Windows 8.1 you will find an option “Boot to Desktop” and if you have activated it, you will be led towards the desktop of OS to start bypassing your “Start” screen.
  1. You should right click on the taskbar and go to the “Properties” from the menu appearing in front of you.
  2. Now you will be in “Taskbar and Navigation Properties”.
  3. Move to the tab “Navigation”.
  4. You need to search the box “Go to the Desktop Instead of Start When I Sign In” and when you find it, you need to mark it.

2) Customizing Tile icons

Windows 8.1 TilesThe users will find two advanced tile sizes in this update. You would be able to resize those 50% smaller and the smallest in it. You would be able to enlarge them to the biggest size as well.
Moreover, you would be able to resize one or various tiles in the “Start” screen by right clicking on them. Medium and Wide are two sizes for the tiles that were also found in Windows 8, but the two new tile sizes Small and Large have been added new into Windows 8.1 by Microsoft.
You can drag and drop various tiles to your desired place by selecting them and you can uninstall them very easily if you want to do so.

3) Improved Search

Search Windows 8.1Now you would be able to use the search function directly from the Start screen of this update. In the previous Windows, you used to get the results in three sorted categories, but now you would have a formed search undergo. Moreover the search results have also been integrated by Microsoft.
Anything you are looking for will be displayed next to the web results bar for you. You would be directly led towards the program, tool or app in the system you were looking for.
For example, if you are looking for “Steam” it will display the “Steam” app you had installed earlier in it. If you are looking for Berlin, it will display the map of the city and important information such as videos, current temperature, weather and much more.

4) New Apps in Windows 8.1

New AppsYou will not see the list of complete apps in “Start” screen. Some apps such as Alarms and Calculator are not prominent here. If you want to add these apps to “Start”, you need to go to the “Apps View” and right click on the apps you want to add to the “Start”.
Calculator: You will see it in both of the scientific and standard mode that helps you in converting units as well.
Sound Recorder: It is the basic Sound Recorder of Windows in application form.
Alarms: This app provides you timer, stopwatch and alarm clock functions. You can set various alarms in it.
Scan: If you want to control the scanners attached with your Desktop for scanning documents, you can use it.

5) Desktop Wallpaper Customization

Windows 8.1 enables you to display the desktop wallpaper to the “Start” screen now. It is amazing feature and to activate it you need to go to the “Taskbar and Navigation” properties and click on the “Navigation”. Here you should mark the “Show my Desktop Background on Start” to activate it.
It will display your desired wallpaper not only to the desktop, but also to the “Start” screen.

6) Media Libraries

You will not find Libraries in Windows Explorer as it has been displayed earlier while the Music, Documents and Pictures categories can be found here. If you want to display Libraries, you need to right click to the sidebar of Windows Explorer and click on the “Show Libraries” option from the context menu.

7) Display Address Bar & Tabs in IE 11 All the Time

When you open IE, it will hide the address bar and the tabs are opened after a while. It is a great option for the users having small screen who intend to use the entire space of their screen to show sites. The users with large resolution or screen would be able to see the address bar and tabs for full time for an easier access.
  1. You need to go to Start screen and open IE 11.
  2. Now click to the “Windows – C to open the “Charms Bar”.
  3. Now click on the “Settings” and go to the “Options”.
  4. Select the option “Always Show Address Bar & Tabs”.

8) The Start Button Menu

When you click the “Start” option, you will not see the start menu. Instead of it you will see the start screen interface. Yet, you can right click on it to see the context menu.
It shows a shutdown option that can be used for changing the power state of your desktop. Some other options are control panel and search or run box, etc.

9) Easy Access to Apps

There are two “All Apps Screen Preferences” in the Taskbar and Navigation” properties that will be so useful for the users.
  1. Show The Apps View Automatically When I Go To Start: This option displays the applications in the list form instead of showing them to the start screen when you need to see them.
  2. List Desktop Apps First in the Apps View When it’s Sorted by Category: This option helps in sending the desktop programs and applications to the front for your easier access.

10) Access Newly Installed Apps

If you install any app to your Windows 8.1 Preview, it will not be displayed automatically to your Start screen. They can be found in the “All Apps Page”. If you want to get there, you need to select the small arrow down key that can be found on the “Start” screen.
Previously you had to use the right click option to get there, but now Microsoft has removed this option and you can swipe up to move there if you are using a Smartphone.
Apps by NameHere, you will see all of the apps you installed on it. New programs and applications are prominent by having a new sign below them and due to this sign, these programs and apps are easy to search.